In this tutorial, we will delve into building a CRUD (Create, Read, Update, Delete) application using Laravel 11 step by step. Laravel, renowned as one of the best PHP frameworks globally, offers a plethora of features for web development. Its elegance lies in its Model-View-Controller (MVC) architecture, which fosters organized and efficient coding practices.
Throughout this tutorial, we’ll explore how to perform CRUD operations seamlessly within Laravel, covering the fundamental aspects of data manipulation: creation, reading, updating, and deletion. Leveraging Laravel’s powerful Eloquent ORM (Object-Relational Mapping), we’ll demonstrate how to interact with the database effortlessly, making the CRUD process a breeze.
By the end of this tutorial, you’ll have a comprehensive understanding of how to architect a Laravel application that seamlessly handles CRUD operations. Whether you’re a seasoned developer or just starting with Laravel, this tutorial will provide you with valuable insights and practical knowledge to empower your web development endeavors.
So, let’s embark on this journey to master Laravel 11 CRUD application development, where simplicity meets robustness, and innovation thrives in every line of code. Get ready to elevate your web development skills with Laravel, the PHP framework that continues to redefine the standards of modern web development.
Install Laravel 11
You can install Laravel 11 by following this article
Setup Laravel 11 Authentication (optional)
You can know it by following this article
Change .env File
By default, the database connection in Laravel 11 is set to SQLite.
DB_CONNECTION=sqlite
# DB_HOST=127.0.0.1
# DB_PORT=3306
# DB_DATABASE=laravel
# DB_USERNAME=root
# DB_PASSWORD=
If you’d like to change the default connection to MySQL, follow these steps:
DB_CONNECTION=mysql
DB_HOST=127.0.0.1
DB_PORT=3306
DB_DATABASE=laravel_11_db
DB_USERNAME=root
DB_PASSWORD=
After that run the project.
Run the Application using the following command
php artisan serveCreate Migration and Model File
Run the php artisan make:model Post -m command on cmd or terminal window to create migration and model file for crud operation application:
php artisan make:model Post -mLaravel will use the name of the migration to attempt to guess the name of the table and whether or not the migration will be creating a new table. If Laravel is able to determine the table name from the migration name, Laravel will pre-fill the generated migration file with the specified table. Otherwise, you may simply specify the table in the migration file manually.
Now open the create_posts_table.php file from /database/migrations/ folder and update the up() function to create a table in your database:
     /**
     * Run the migrations.
     */
    public function up(): void
    {
        Schema::create('posts', function (Blueprint $table) {
            $table->id();
            $table->string('title');
            $table->string('description');
            $table->timestamps();
        });
    }
After modifying the column names then run the migrate command to create the tables in the databases. Before running the command please save the project and then run it.
php artisan migrateDefine CRUD Resource Routes
Open the “web.php” file located in the routes folder and define resource routes for your CRUD application, similar to the following:
use App\Http\Controllers\PostController;

Route::resource('posts', PostController::class);
Create CRUD Operation Controller
Run php artisan make:controller PostController command on cmd to create controller file:
php artisan make:controller PostController
Now, navigate to the “PostController.php” file within the “app/Http/Controllers” folder and create methods to handle CRUD operations with the database. Here’s an example structure:
<?php

namespace App\Http\Controllers;

use App\Models\Post;
use Illuminate\Http\Request;

class PostController extends Controller
{
    /**
     * Display a listing of the resource.
     *
     * @return \Illuminate\Http\Response
     */
    public function index()
    {
        $data['posts'] = Post::orderBy('id','desc')->paginate(5);

        return view('posts.index', $data);
    }

    /**
     * Show the form for creating a new resource.
     *
     * @return \Illuminate\Http\Response
     */
    public function create()
    {
        return view('posts.create');
    }

    /**
     * Store a newly created resource in storage.
     *
     * @param  \Illuminate\Http\Request  $request
     * @return \Illuminate\Http\Response
     */
    public function store(Request $request)
    {
        $request->validate([
            'title' => 'required',
            'description' => 'required'
        ]);

        $post = new Post;

        $post->title = $request->title;
        $post->description = $request->description;


        $post->save();


        return redirect()->route('posts.index')
                        ->with('success','Post has been created successfully.');
    }

    /**
     * Display the specified resource.
     *
     * @param  \App\Post  $post
     * @return \Illuminate\Http\Response
     */
    public function show(Post $post)
    {
        return view('posts.show',compact('post'));
    }

    /**
     * Show the form for editing the specified resource.
     *
     * @param  \App\Post  $post
     * @return \Illuminate\Http\Response
     */
    public function edit(Post $post)
    {
        return view('posts.edit',compact('post'));
    }

    /**
     * Update the specified resource in storage.
     *
     * @param  \Illuminate\Http\Request  $request
     * @param  \App\Post  $post
     * @return \Illuminate\Http\Response
     */
    public function update(Request $request, $id)
    {
        $request->validate([
            'title' => 'required',
            'description' => 'required',
        ]);

        $post = Post::find($id);

        $post->title = $request->title;
        $post->description = $request->description;

        $post->save();

        return redirect()->route('posts.index')
                        ->with('success','Post Has Been updated successfully');
    }

    /**
     * Remove the specified resource from storage.
     *
     * @param  \App\Post  $post
     * @return \Illuminate\Http\Response
     */
    public function destroy(Post $post)
    {
        $post->delete();

        return redirect()->route('posts.index')
                        ->with('success','Post has been deleted successfully');
    }
}
Create CRUD Views File
Navigate to the “resources/views” folder and create a new folder within it named “posts”. Inside the “posts” folder, create the following files: “index.blade.php”, “create.blade.php”, and “edit.blade.php”. This directory structure will organize your views for the CRUD operations of the application.
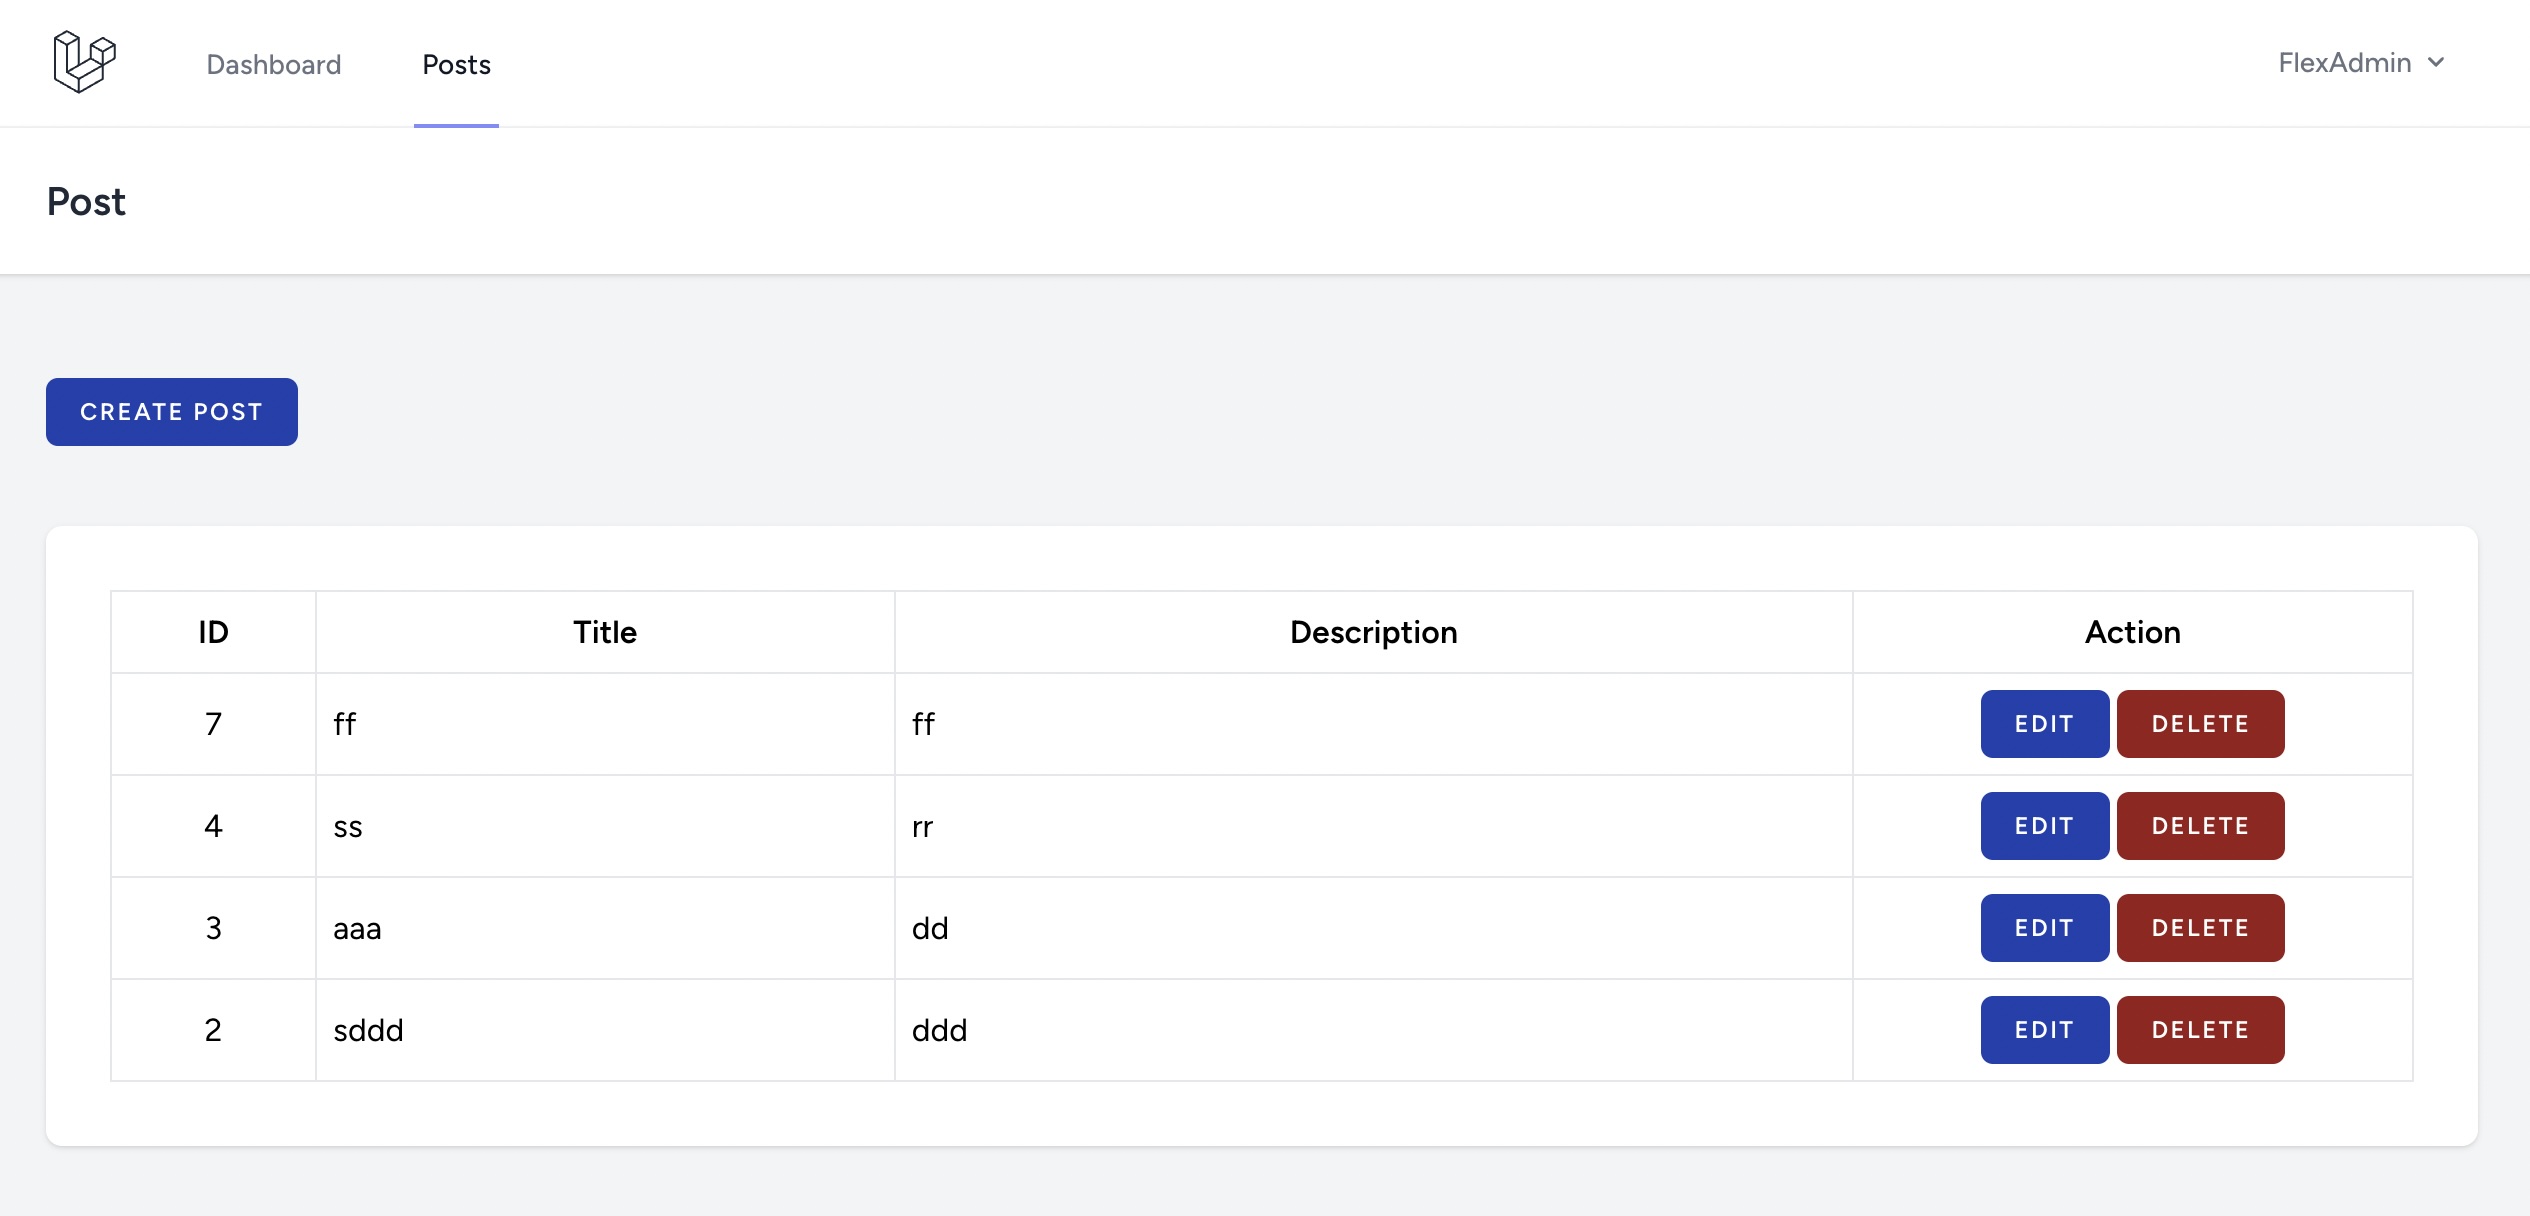
Now, open the “index.blade.php” file and create HTML markup to display a list of posts fetched from the database. Here’s an example structure:
<x-app-layout>
  <x-slot name="header">
    <h2 class="font-semibold text-xl text-gray-800 dark:text-gray-200 leading-tight">
      {{ __('Post') }}
    </h2>
  </x-slot>

  <div class="pt-5">
    <div class="max-w-7xl mx-auto space-y-6">
      <div class="sm:p-8">
        <a class="inline-flex items-center px-4 py-2 bg-blue-800 dark:bg-blue-200 border border-transparent rounded-md font-semibold text-xs text-white dark:text-blue-800 uppercase tracking-widest hover:bg-blue-700 dark:hover:bg-white focus:bg-blue-700 dark:focus:bg-white active:bg-blue-900 dark:active:bg-blue-300 focus:outline-none focus:ring-2 focus:ring-indigo-500 focus:ring-offset-2 dark:focus:ring-offset-blue-800 transition ease-in-out duration-150"
          href="{{ route('posts.create') }}"> Create Post</a>
      </div>
    </div>
  </div>

  @if ($message = Session::get('success'))
    <div class="max-w-7xl mx-auto sm:px-6 lg:px-8 space-y-6 mb-5">
      <div class=" bg-blue-100 border border-blue-400 text-blue-700 px-4 py-3 rounded relative" role="alert">
        <span class="block sm:inline">
        <p>{{ $message }}</p>
        </span>
      </div>
    </div>
  @endif

  <div class="py-2">
    <div class="max-w-7xl mx-auto sm:px-6 lg:px-8 space-y-6">
      <div class="p-4 sm:p-8 bg-white dark:bg-gray-800 shadow sm:rounded-lg">

        <table class="table-auto w-full">
          <tr>
            <th class="border py-2">ID</th>
            <th class="border">Title</th>
            <th class="border">Description</th>
            <th class="border" width="280px">Action</th>
          </tr>
          @foreach ($posts as $nts)
            <tr>
              <td class="border text-center">{{ $nts->id }}</td>
              <td class="border p-2">{{ $nts->title }}</td>
              <td class="border p-2">{{ $nts->description }}</td>
              <td class="border p-2 text-center">
                <form action="{{ route('posts.destroy', $nts->id) }}" method="Post">
                  <a class="inline-flex items-center px-4 py-2 bg-blue-800 dark:bg-blue-200 border border-transparent rounded-md font-semibold text-xs text-white dark:text-blue-800 uppercase tracking-widest hover:bg-blue-700 dark:hover:bg-white focus:bg-blue-700 dark:focus:bg-white active:bg-blue-900 dark:active:bg-blue-300 focus:outline-none focus:ring-2 focus:ring-indigo-500 focus:ring-offset-2 dark:focus:ring-offset-blue-800 transition ease-in-out duration-150"
                    href="{{ route('posts.edit', $nts->id) }}">Edit</a>
                  @csrf
                  @method('DELETE')

                  <button type="submit"
                    class="inline-flex items-center px-4 py-2 bg-red-800 dark:bg-red-200 border border-transparent rounded-md font-semibold text-xs text-white dark:text-red-800 uppercase tracking-widest hover:bg-red-700 dark:hover:bg-white focus:bg-red-700 dark:focus:bg-white active:bg-red-900 dark:active:bg-red-300 focus:outline-none focus:ring-2 focus:ring-indigo-500 focus:ring-offset-2 dark:focus:ring-offset-red-800 transition ease-in-out duration-150">Delete</button>
                </form>
              </td>
            </tr>
          @endforeach
        </table>
      </div>
    </div>
  </div>
  {!! $posts->links() !!}
</x-app-layout>
Next, open the “create.blade.php” file and create a form to enable the creation of a new post. Here’s an example structure:
<x-app-layout>
  <x-slot name="header">
    <h2 class="font-semibold text-xl text-gray-800 dark:text-gray-200 leading-tight">
      {{ __('Create Post') }}
    </h2>
  </x-slot>
  @if (session('status'))
    <div class="alert alert-success mb-1 mt-1">
      {{ session('status') }}
    </div>
  @endif
  <div class="max-w-7xl mx-auto mt-6 px-6 py-4 bg-white dark:bg-gray-800 shadow-md overflow-hidden sm:rounded-lg">
    <div class="sm:max-w-md ">
      <form action="{{ route('posts.store') }}" method="POST" enctype="multipart/form-data" class="mt-6 space-y-6">
        @csrf
        <div>
          <x-input-label for="title" :value="__('Title')" />
          <x-text-input id="title" name="title" type="text" class="mt-1 block w-full" />
          @error('title')
            <div class="text-red-500 mt-1 mb-1">{{ $message }}</div>
          @enderror
        </div>

        <div>
          <x-input-label for="description" :value="__('Description')" />
          <x-text-input id="description" name="description" type="text" class="mt-1 block w-full" />
          @error('description')
            <div class="text-red-500 mt-1 mb-1">{{ $message }}</div>
          @enderror
        </div>

        <div class="flex items-center gap-4">
          <x-primary-button>{{ __('Save') }}</x-primary-button>
          <a href="/posts" class="inline-flex items-center px-4 py-2 bg-blue-800 dark:bg-blue-200 border border-transparent rounded-md font-semibold text-xs text-white dark:text-blue-800 uppercase tracking-widest hover:bg-blue-700 dark:hover:bg-white focus:bg-blue-700 dark:focus:bg-white active:bg-blue-900 dark:active:bg-blue-300 focus:outline-none focus:ring-2 focus:ring-indigo-500 focus:ring-offset-2 dark:focus:ring-offset-blue-800 transition ease-in-out duration-150">Back</a>
        </div>
      </form>
    </div>
</x-app-layout>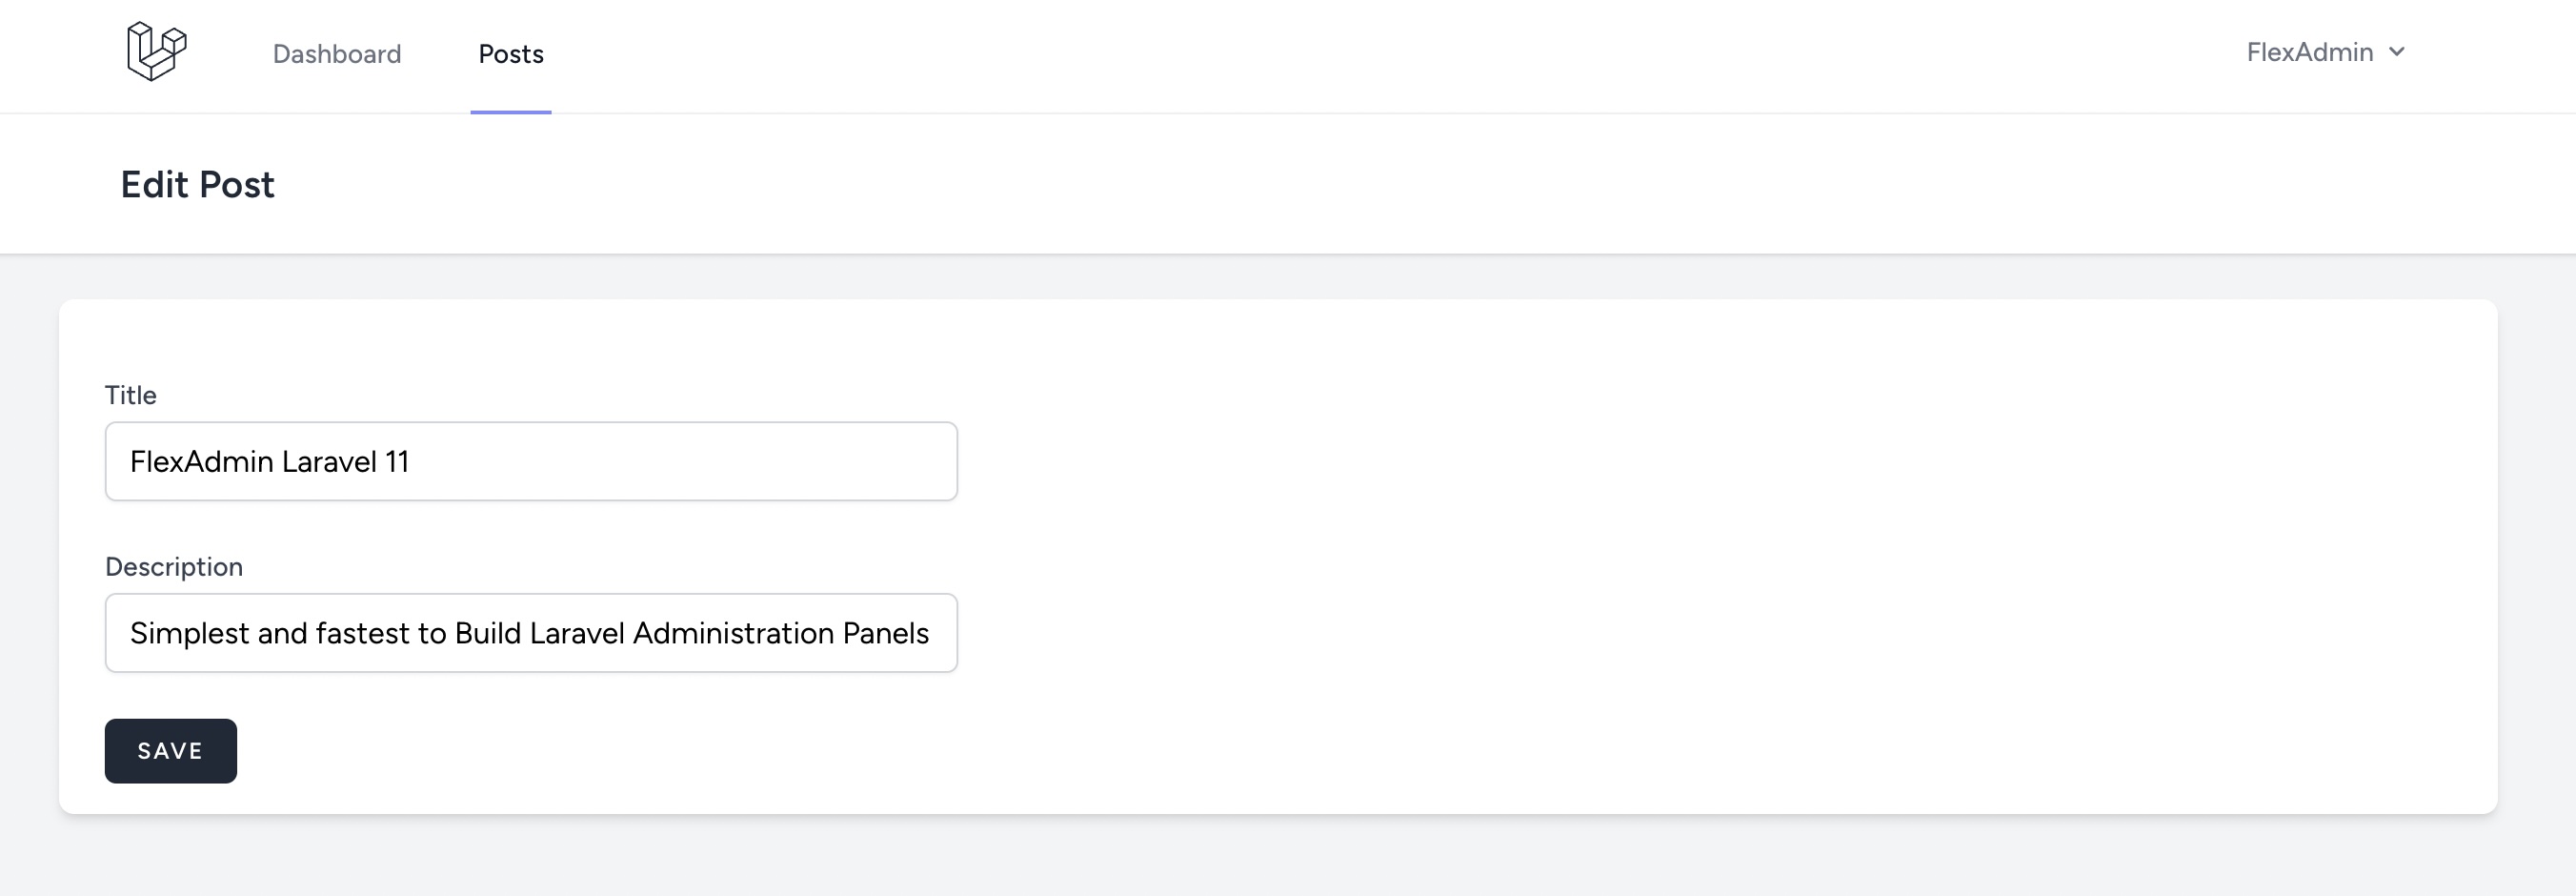
Now, open the “edit.blade.php” file and construct a form to facilitate editing of post data retrieved from the database. Below is an example structure:
<x-app-layout>
  <x-slot name="header">
    <h2 class="font-semibold text-xl text-gray-800 dark:text-gray-200 leading-tight">
      {{ __('Edit Post') }}
    </h2>
  </x-slot>

  @if (session('status'))
    <div class="bg-red-100 border border-blue-400 text-blue-700 px-4 py-3 rounded relative" role="alert">
      <span class="block sm:inline">{{ session('status') }}</span>
    </div>
  @endif
  <div class="max-w-7xl mx-auto mt-6 px-6 py-4 bg-white dark:bg-gray-800 shadow-md overflow-hidden sm:rounded-lg">
    <div class=" sm:max-w-md ">
      <form action="{{ route('posts.update', $post->id) }}" method="POST" class="mt-6 space-y-6"
        enctype="multipart/form-data">
        @csrf
        @method('PUT')

        <div>
          <x-input-label for="title" :value="__('Title')" />
          <x-text-input id="title" name="title" type="text" class="mt-1 block w-full"
            value="{{ $post->title }}" />
          @error('title')
            <div class="text-red-500 mt-1 mb-1">{{ $message }}</div>
          @enderror
        </div>
        <div>
          <x-input-label for="description" :value="__('Description')" />
          <x-text-input id="description" name="description" type="text" class="mt-1 block w-full"
            value="{{ $post->description }}" />
          @error('description')
            <div class="text-red-500 mt-1 mb-1">{{ $message }}</div>
          @enderror
        </div>

        <div class="flex items-center gap-4">
          <x-primary-button>{{ __('Save') }}</x-primary-button>
        </div>
      </form>
    </div>
  </div>
</x-app-layout>
Run and Test the Application
Execute the “php artisan serve” command in your command prompt to launch the application server. You can then test the application in your web browser by navigating to the provided local server URL.
php artisan serveMake sure the test account is created and logged in to the Dashboard
Now, open your browser and type the following URL into it for testing:
http://127.0.0.1:8000/posts
We trust that with the assistance of this tutorial, you’ve gained the knowledge to develop a CRUD operation application in Laravel 11, following the step-by-step guidance provided.
If you encounter any issues while working with the Laravel 11 framework, please feel free to comment or email us at support@flexadmin.io. We are committed to resolving your queries promptly and ensuring a smooth development experience.
Happy coding!

